When I started my woodworking hobby, like many others, I was on a tight budget. I purchased the Harbor Freight “2 HP” dust collector. This was better than nothing, but not by much. I experimented with Thein baffles, which worked OK but allowed the “fines” to pass to the filter, necessitating frequent cleanings. I replaced the Thein baffle with an Oneida Super Dust Deputy with the blower mounted directly on top with 4-inch PVC ducts along two walls. This worked extremely well in my small shop.
I recently relocated and now have a full 2-car garage available for my workshop. There’s room for more machinery, so I needed something a bit larger to handle the additional machines. Also, being attached to the house, I wanted the best dust control that I could afford.
Requirements
- Within budget - $1750 including remote control
- Cyclone separator with 30-Gallon drum. Large enough for my hobby work yet manageable for me to empty.
- MERV-15 or better filters
- Support for 6-inch main ducts
Parts
I will list each major part and supplier separately. I imagine that these parts could be substituted with equivalent items to obtain similar results.
Blower
I purchased a Grizzly G1030Z2P dust collector directly from Grizzly (https://www.grizzly.com). The delivered cost was about $920, including residential lift-gate service. Since I was going to use high-quality filters, I selected this model as it was the least expensive and would not require me to adapt the wider/shorter Grizzly filters to my design. I was unable to find a 3 HP blower with similar specifications elsewhere at a lower cost.
Cyclone
I purchased the Super Dust Deputy XL directly from Oneida Air Systems (https://www.oneida-air.com/). I also purchased the 7-6 inch reducer pre-crimped to fit the SDD-XL and a roll of foil tape. With tax and shipping, this totaled $320.
Filters
I had very good success with Tenkay/Farr style filters in my last design, so I looked for a supplier. These filters have flame-retardant nano-fiber material with 0.5 micron capability. They are available in 22, 26, and 34-inch lengths, and the square feet of filter material grows significantly with the added length. Since I would hang these from a plenum box above my air compressor to maximize floor space, I selected the 34-inch model, which allowed about 3-inches of clearance between the compressor and the filter. These filters have a 14.25 by 16-inch flange on the open side, a 12-inch round gasket, and 12.75-inch outside / 8.5-inch inside diameters. These provide 295 square feet of filter material each.
I selected model number 125154-008 and specified the Nano-Fiber material option. These were $147 each, and with $25 shipping, they totaled $319. I purchased them from Cardinal Filters (https://cardinalfilters.com). They were about $7 more expensive than the lowest-cost source, but $25 in shipping compared to $99, the choice was easy to make.
Miscellaneous Materials
- 2 – ¾ by 12 by 48-inch Bullnose MDF Shelf boards - $4.63 each $9.26
One would be cut to form the sides and ends of the plenum box, the
other formed the top.
- 1 – ¾ by 16 by 36-inch Bullnose MDF Shelf boards - $10.14 each $10.14
This became the bottom of the plenum box.
- 5/4 by 4 by 36-inch Pine (scrap box, 6-foot length price shown) $14.25
This was used to make the French Cleat to hang the plenum box.
- Screws, Paint (on-hand)
All told, these parts and materials cost me $1603. I built my own 220V radio remote power switch for about $85 in parts, which left $62 in my original budget for items I didn’t have on-hand or in my scrap box. All in all, it created an effective system within budget, for about 15-hours of labor over a few days. (It probably can be done much more quickly, but I took my time and enjoyed the process!)
Planning
I use the Inkscape drawing program to lay out the design and create cut-lists. Any other drawing or CAD program would work equally as well.
Since I had used the Farr-style filters and hung my old blower on the wall previously, I thought about what could be done better in this design. The old blower was bolted to a plate that was screwed directly to the wall studs. Easy and effective, but difficult to wrestle the blower into position and tighten the bolts. The new design would have a panel on the wall that supported the blower mount and the outlet duct, and would hang on the wall from a French Cleat. Simply* lift and hang. This was important as the new 3-HP blower was considerably heavier than the old 2-HP blower!
*"Simply" – a poor choice of words, as the size and weight made this difficult for 64-year-old me alone to lift. My (half my age) neighbor lent a hand, and with one of us on each side, it was easy to lift into position on the cleat.
 My old filter housing was made from plywood, had a 5-inch inlet on the top and “L” shaped wood brackets that the filter flange slid in to. I used hold-down clamps in each corner to compress the gasket. The rear clamps were difficult to reach, and with the new design having twin filters, it would be nearly impossible to reach the two in the center-rear position. By making the new housing from MDF, the gasket could easily compress on the smooth surface, so I created an “L” bracket on the back of the filter such that it would be about 1/8 inch undersized to provide a snug fit with a single front latch.
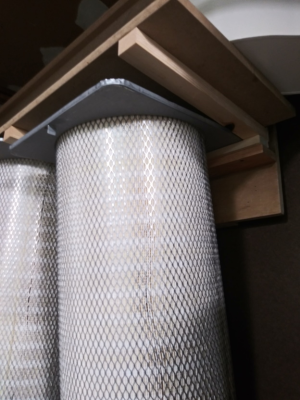
The image here – looking up from below – shows how the bottom plate has exhaust holes, and the filters slide between the guides. The guides are 1” by 1.5”, cut from a piece of 5/4 Pine. The small extensions at the top (rear) provide a positive stop, centering the hole in the filter flange over the exhaust hole in the plenum box.
This photo shows the filters partially inserted and show the “flange” and filter outer diameter. Not shown here, but across the back of the 3 guides would have a 1x2” piece that compressed the flange against the bottom plate. The filter flange will slide under this rear guide and when clamped at the front, would suitably compress the gasket to provide a tight seal, with easy attachment or removal.
The sketches in Inkscape to work out the design and are not to actual scale. The exact measurements of the plenum box were determined by the actual installation requirements. Now that I had the minimum dimensions of the plenum box, I could lay out the rest of the components.
Layout & Preparation
I began by creating the mount for the blower. This was made from 2 sheets of 3/4 plywood that was glued and screwed together. A piece of 5/4x4" board cut lengthwise at 45-degrees was screwed to the top edge to form a French Cleat - the other part was screwed to the wall with 4" #14 screws. The wall cleat stretched between 3 studs, while the part on the mounting plate was trimmed to the same width as the plate. A piece of scrap 5/4 was glued/screwed to the bottom of the backer plate to keep it parallel to the wall.
More doubled-up plywood was attached 90-degrees to the back plate and used to mount the blower. A second piece was cut diagonally to help support the output-side of the blower. The plywood was painted (Grizzly Green) and the blower was mounted. With some help, it was lifted into position on the wall.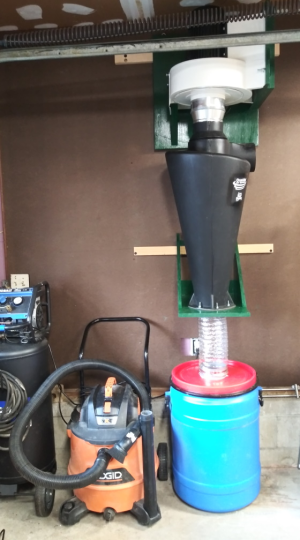
With the blower mounted, I could begin making measurements to hang a small shelf to hold the Super Dust-Deputy Cyclone. The shelf was another 2 rectangles of 3/4 plywood. I used 2 screws to hold these together, then cut the 6" hole centered left/right along the narrow width and close to one edge on the long side. I confirmed that the hole would pass the 6" starter collar, then separated the two pieces. Inserting the collar into the bottom piece of plywood, I traced the diameter of the flange. I routed the inside of the lower plywood so that the flange was recessed about 1/16", or about 1/8" deep rebate. I squirted some silicone around the collar ring, inserted it into the lower panel and secured it with some 1/2" flat-head screws.
I positioned the SDD cyclone on the upper plywood panel and marked the mounting hole positions. After drilling a 1/16" hole through the plywood, I used a Fostner bit to recess the mounting bolt holes, then drilled the clearance hole. The bolts were secured into the recessed holes with epoxy, the SDD cyclone was mounted and the bolts snugged. This was set aside until the epoxy cured. Once cured, I used some saw horses to hold the SDD and mounting board level with the back of the board against the wall. I measured the distance from the blower backer board to the edge of the inlet, adding the thickness of the backer board and mounting cleat. I could then determine the position of the SDD inlet. I needed to trim the mounting shelf about 1.75" to gain alignment.
I screwed the upper and lower panels together and then trimmed them to the correct length. Some plywood triangles were secured with pocket holes, a brace added across the back, and a 1x3 cut to form another French Cleat. Again, the wall cleat spanned 3 studs, while the shelf was trimmed to fit. I temporarily assembled everything to determine the best position for the wall cleat. I drilled holes for 2 screws and loosely inserted one so the wall cleat could swivel. I next applied the gasket material, and re-attached the SDD and secured the bolts.
The Cyclone assembly was attached to the blower inlet and the shelf squared to the wall. I swiveled the wall cleat into position and drove the second screw home, then tightened the first. The assembly was completed by using some clear 6" duct to connect the collar on the bottom of the cyclone shelf to the matching collar I installed into the top of the 30-gallon barrel.
The barrel simply had a hole cut to clear the starting collar and the 6 mounting screws. A bead of silicone caulk was applied and the collar inserted from the underside of the barrel lid.
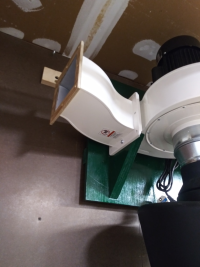 Finding the best method to attach the plenum box to the blower came next. I first considered a direct attachment, but found it difficult to secure the box to the blower outlet once the blower was on the wall. Pre-attaching the plenum box to the blower would result in an awkward system to mount and this idea was dismissed. I then looked at the parts I had available. The original duct that connected the blower to the two bag pans had a sweeping “S” curve. I found that the point in the middle of the “S” would allow me to make a straight cut and mount the plenum box close to the wall while allowing the air to flow down the center of the box. An angle grinder with a diamond cutting wheel made quick work of the original duct.
Next was to create a backer-board from ¾” plywood large enough to mount the plenum box. This used a 5/4” French Cleat – same thickness as the blower backer board – to mount to the wall next to and just below the blower. Mounting this on the wall and attaching the cut piece of duct allowed me to mark the points where the duct was in relation to the backer board. This gave me the location for the bottom and right-edge of the plenum box. Note in the photo there is a piece of 1/4" plywood cut to represent the flange, which aided in matching the position to cut the hole in the plenum box.
With the locations identified, I removed the backer board from the wall and started preparing the plenum box. This was made from 3/4" MDF shelving boards. These were 4' long and allowed me to use two un-modified for the top and bottom, and a third cut roughly in half to form the sides and ends. I worked first from the bottom, laying out the two filter positions, attaching the 5/4" strips to position the filter bases. the filter sat about 1/8" proud of these, so when I added the cross-piece at the rear and clamped the front, the gasket was sufficiently compressed. I used a router circle cutting jig to cut the holes in the bottom, then went about assembling the sides and ends
I decided to make the top of the plenum box removable so during construction I added three cross-braces with Tee nuts that allowed me to secure the top with 1/4-20 bolts. This also allowed me to mount the duct to the blower with one bolt, hang the plenum box and slide it on the cleat to meet the duct. I marked the position, took everything down to the workbench and drilled holes around the edge of the duct to secure it to the plenum box. I pre-drilled the holes in the MDF and squirted some CA into the holes before assembly to prevent splitting. (Install the screws after the CA cures.) After applying a bead of silicone caulk to the bottom and two sides and some weatherstrip to the top, I returned the plenum to its mounting cleat and slid it into position. The gasket was inserted, the gap closed, and the bolts installed.
The Result
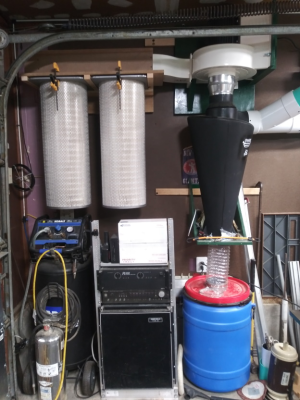
 Here is the finished dust collector. This photo was taken prior to the plenum box being painted, but aside from it now being green, it's been working in this configuration since the spring. You can see how hanging it on the wall keeps the blower, cyclone, and collection drum in a relatively narrow footprint. The oversize filters - 490 square feet of filter area - hang high and provide clearance for a 22-gallon compressor and the rack with the RV fridge, stereo/amp, and a media PC.
The entire shop uses thin wall 6" PVC pipe for the main runs, which then drop to 4" to the machines. On the right you can see the floor-sweep and the hard piping to the table saw and the router table. The machine connections employ a 6" length of flex-hose to minimize the introduction of any vibration into the ducts, but otherwise all connections are hard pipe.
The blast gate is mounted at the machine port, and since the table saw port is behind and near the bottom of the saw, it is controlled with a choke cable. The control knob is conveniently mounted next to the saw power switch.
Controlling the Dust Collector
I built my own remote control for the dust collector that allows me to use either a remote-control or blast-gate mounted switches. I currently use the remote but will probably add some gate-activated switches in the future. I'll document that in a separate blog article.